Table of Contents
Introduction
Wiring a 3-way switch can seem daunting at first, but with the right knowledge and tools, it becomes a manageable task. Whether you're a DIY enthusiast or a professional electrician, understanding the intricacies of a 3-way switch is essential for controlling lights from multiple locations. This guide will walk you through the process step-by-step, ensuring you have all the information you need to complete the job safely and effectively.
A 3-way switch allows you to control a single light or set of lights from two different locations, such as the top and bottom of a staircase or opposite ends of a hallway. This functionality is highly practical in modern homes, and mastering the wiring process can save you time and money. By following this guide, you'll gain the expertise to tackle this project with confidence.
In this article, we’ll cover everything from the basics of what a 3-way switch is to advanced techniques for troubleshooting and optimizing your setup. Let’s dive into the details and get started!
Read also:Discover The Allure Of Barbienjd A Comprehensive Guide To Style And Influence
What is a 3-Way Switch?
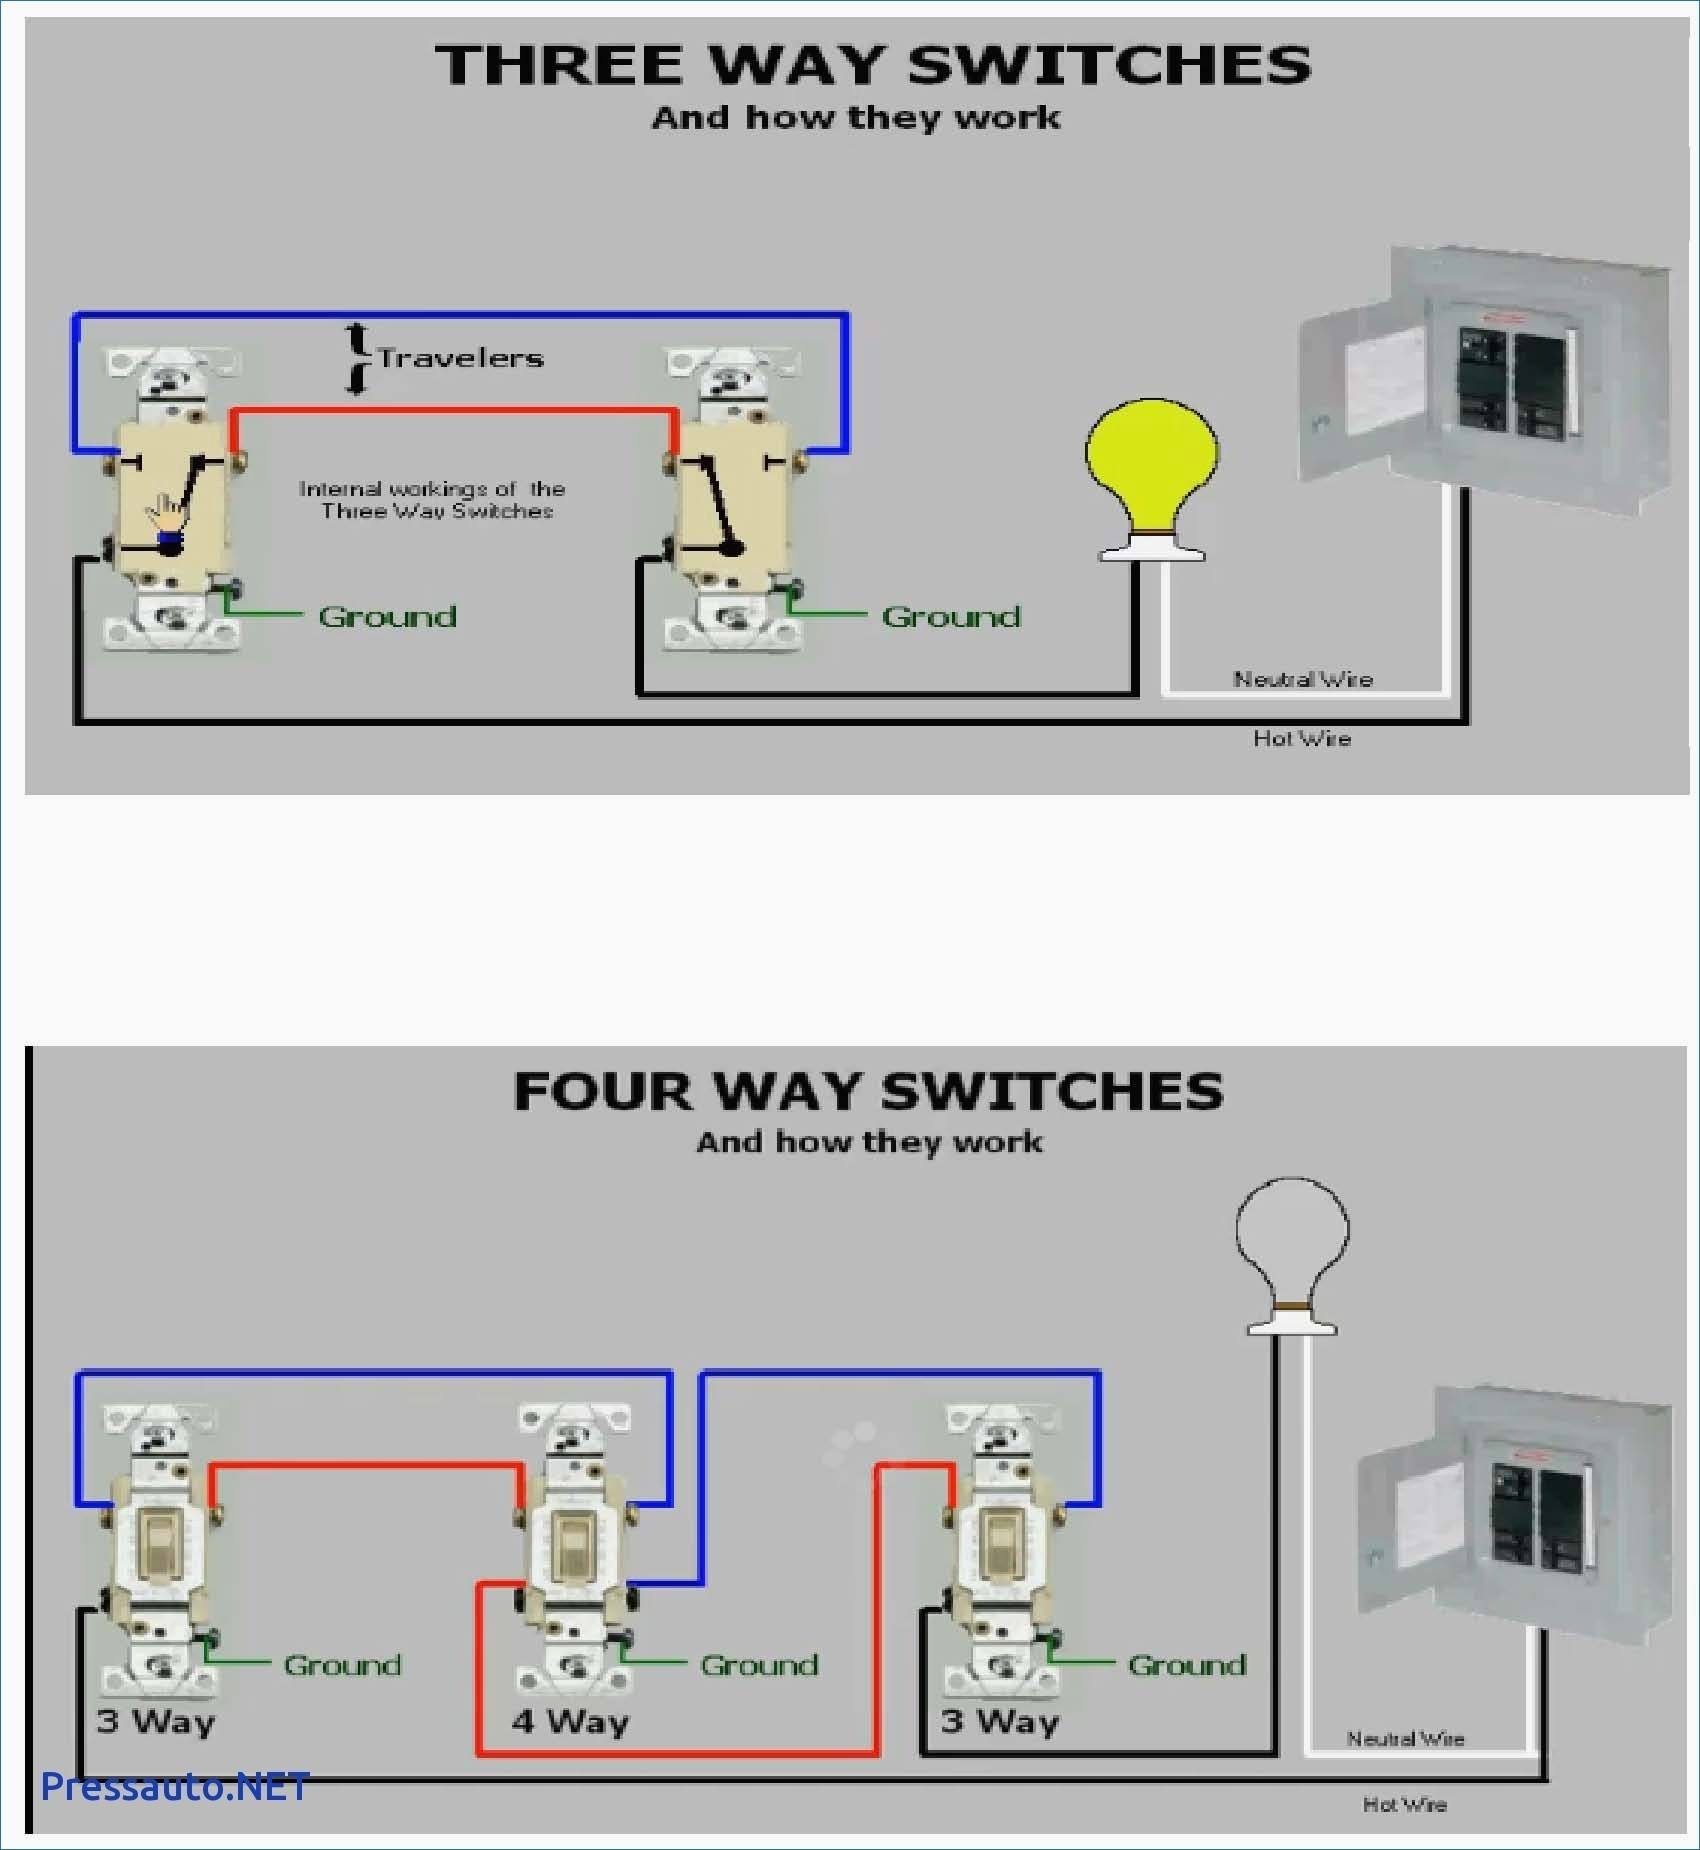
A 3-way switch is a type of electrical switch that allows you to control a single light or set of lights from two different locations. Unlike a standard single-pole switch, which has two terminals, a 3-way switch has three terminals, allowing it to work in tandem with another switch to control the same light source.
Here’s a breakdown of how it works:
- Two Switches: A 3-way switch setup involves two switches connected to the same light fixture.
- Three Terminals: Each switch has three terminals—one common terminal and two traveler terminals.
- Traveler Wires: The traveler wires connect the two switches, allowing them to communicate and control the light.
This configuration makes it possible to turn a light on or off from either switch, regardless of the position of the other switch.
Tools and Materials Needed
Before starting the wiring process, it’s important to gather all the necessary tools and materials. Here’s a list of what you’ll need:
- 3-Way Switches: You’ll need two 3-way switches for the setup.
- Screwdriver: A flathead or Phillips screwdriver for attaching wires to the switch terminals.
- Wire Strippers: To strip the insulation from the wires.
- Voltage Tester: To ensure the power is off before starting work.
- Electrical Tape: For insulating wire connections.
- Wire Nuts: To secure wire connections.
- Fish Tape: For pulling wires through walls if needed.
Having all these tools and materials ready will make the process smoother and more efficient.
Step-by-Step Guide to Wiring a 3-Way Switch
Now that you understand the basics and have your tools ready, let’s walk through the process of wiring a 3-way switch step-by-step:
Read also:Vegamovies 1080p Your Ultimate Guide To Highquality Movie Downloads
Step 1: Turn Off the Power
Before you begin any electrical work, ensure the power is turned off at the breaker box. Use a voltage tester to confirm that the circuit is dead.
Step 2: Identify the Wires
Identify the wires in the electrical box. Typically, you’ll have:
- Line Wire: The wire bringing power from the breaker box.
- Load Wire: The wire going to the light fixture.
- Traveler Wires: The wires connecting the two switches.
Step 3: Connect the Wires to the First Switch
Attach the line wire to the common terminal of the first switch. Connect the traveler wires to the traveler terminals.
Step 4: Connect the Wires to the Second Switch
Attach the load wire to the common terminal of the second switch. Connect the traveler wires to the traveler terminals.
Step 5: Secure the Switches
Once all connections are made, secure the switches into the electrical boxes and attach the faceplates.
Step 6: Test the Setup
Turn the power back on and test the switches to ensure they control the light as expected.
Common Mistakes to Avoid
Even experienced electricians can make mistakes when wiring a 3-way switch. Here are some common pitfalls to avoid:
- Incorrect Wire Connections: Ensure you connect the line, load, and traveler wires to the correct terminals.
- Skipping Safety Checks: Always turn off the power and verify it’s off before starting work.
- Poor Insulation: Make sure all wire connections are properly insulated to prevent short circuits.
By avoiding these mistakes, you can ensure a safe and functional wiring setup.
Safety Tips for Electrical Work
Electrical work can be dangerous if not done properly. Follow these safety tips to protect yourself and others:
- Turn Off the Power: Always turn off the power at the breaker box before starting work.
- Use a Voltage Tester: Verify that the circuit is dead before handling wires.
- Wear Protective Gear: Use gloves and safety glasses to protect yourself from accidental shocks.
These precautions will help ensure your safety while working on electrical projects.
Troubleshooting Common Issues
If your 3-way switch setup isn’t working as expected, here are some common issues and how to fix them:
- Switch Doesn’t Work: Double-check the wire connections to ensure they’re correct.
- Flickering Lights: This could indicate a loose connection or poor insulation.
- No Power to the Light: Verify that the power is on and the circuit breaker hasn’t tripped.
Troubleshooting these issues can help you identify and resolve problems quickly.
Advanced Wiring Techniques
Once you’ve mastered the basics of wiring a 3-way switch, you can explore more advanced techniques, such as:
- Adding a 4-Way Switch: This allows you to control a light from three or more locations.
- Using Smart Switches: Replace traditional switches with smart switches for added convenience and control.
- Optimizing Wire Layout: Plan your wiring layout to minimize cable length and improve efficiency.
These techniques can enhance the functionality and efficiency of your electrical setup.
Frequently Asked Questions
Here are some common questions about wiring a 3-way switch:
Q: Can I use a 3-way switch for more than two locations?
A: No, for more than two locations, you’ll need to add a 4-way switch.
Q: What if my wires are different colors?
A: Use a multimeter to identify the line, load, and traveler wires based on their function.
Q: Is it safe to do this myself?
A: If you follow safety guidelines and have basic electrical knowledge, it’s safe to do it yourself.
Conclusion
Wiring a 3-way switch is a practical skill that can enhance the functionality of your home’s lighting system. By following this guide, you’ve gained the expertise to complete the task safely and effectively. Remember to always prioritize safety and double-check your work to ensure everything functions as expected.
If you found this guide helpful, please consider sharing it with others or leaving a comment below. For more tips and tutorials, explore our other articles on electrical projects and home improvement. Happy wiring!