Wiring a three-way switch may seem intimidating at first glance, but with the right guidance, it can be a straightforward and rewarding DIY project. Whether you're looking to enhance your home's lighting system or simply want to understand how electrical circuits work, mastering the wiring of a three-way switch is an essential skill. This guide will walk you through everything you need to know, from understanding the basics to executing the wiring process safely and efficiently.
Three-way switches are commonly used in homes to control a single light or set of lights from two different locations. This functionality is particularly useful in hallways, staircases, and large rooms where multiple entry points require access to lighting controls. Despite their widespread use, many homeowners hesitate to tackle this project due to concerns about electrical safety and the complexity of wiring configurations.
In this article, we will break down the process into manageable steps, ensuring that you have all the information you need to complete the task confidently. From understanding the components involved to providing practical tips for troubleshooting, this guide is designed to be your go-to resource for all things related to wiring a three-way switch.
Read also:Somali Wasmo Telegram Link 2024 A Comprehensive Guide
Table of Contents
Understanding Three-Way Switches
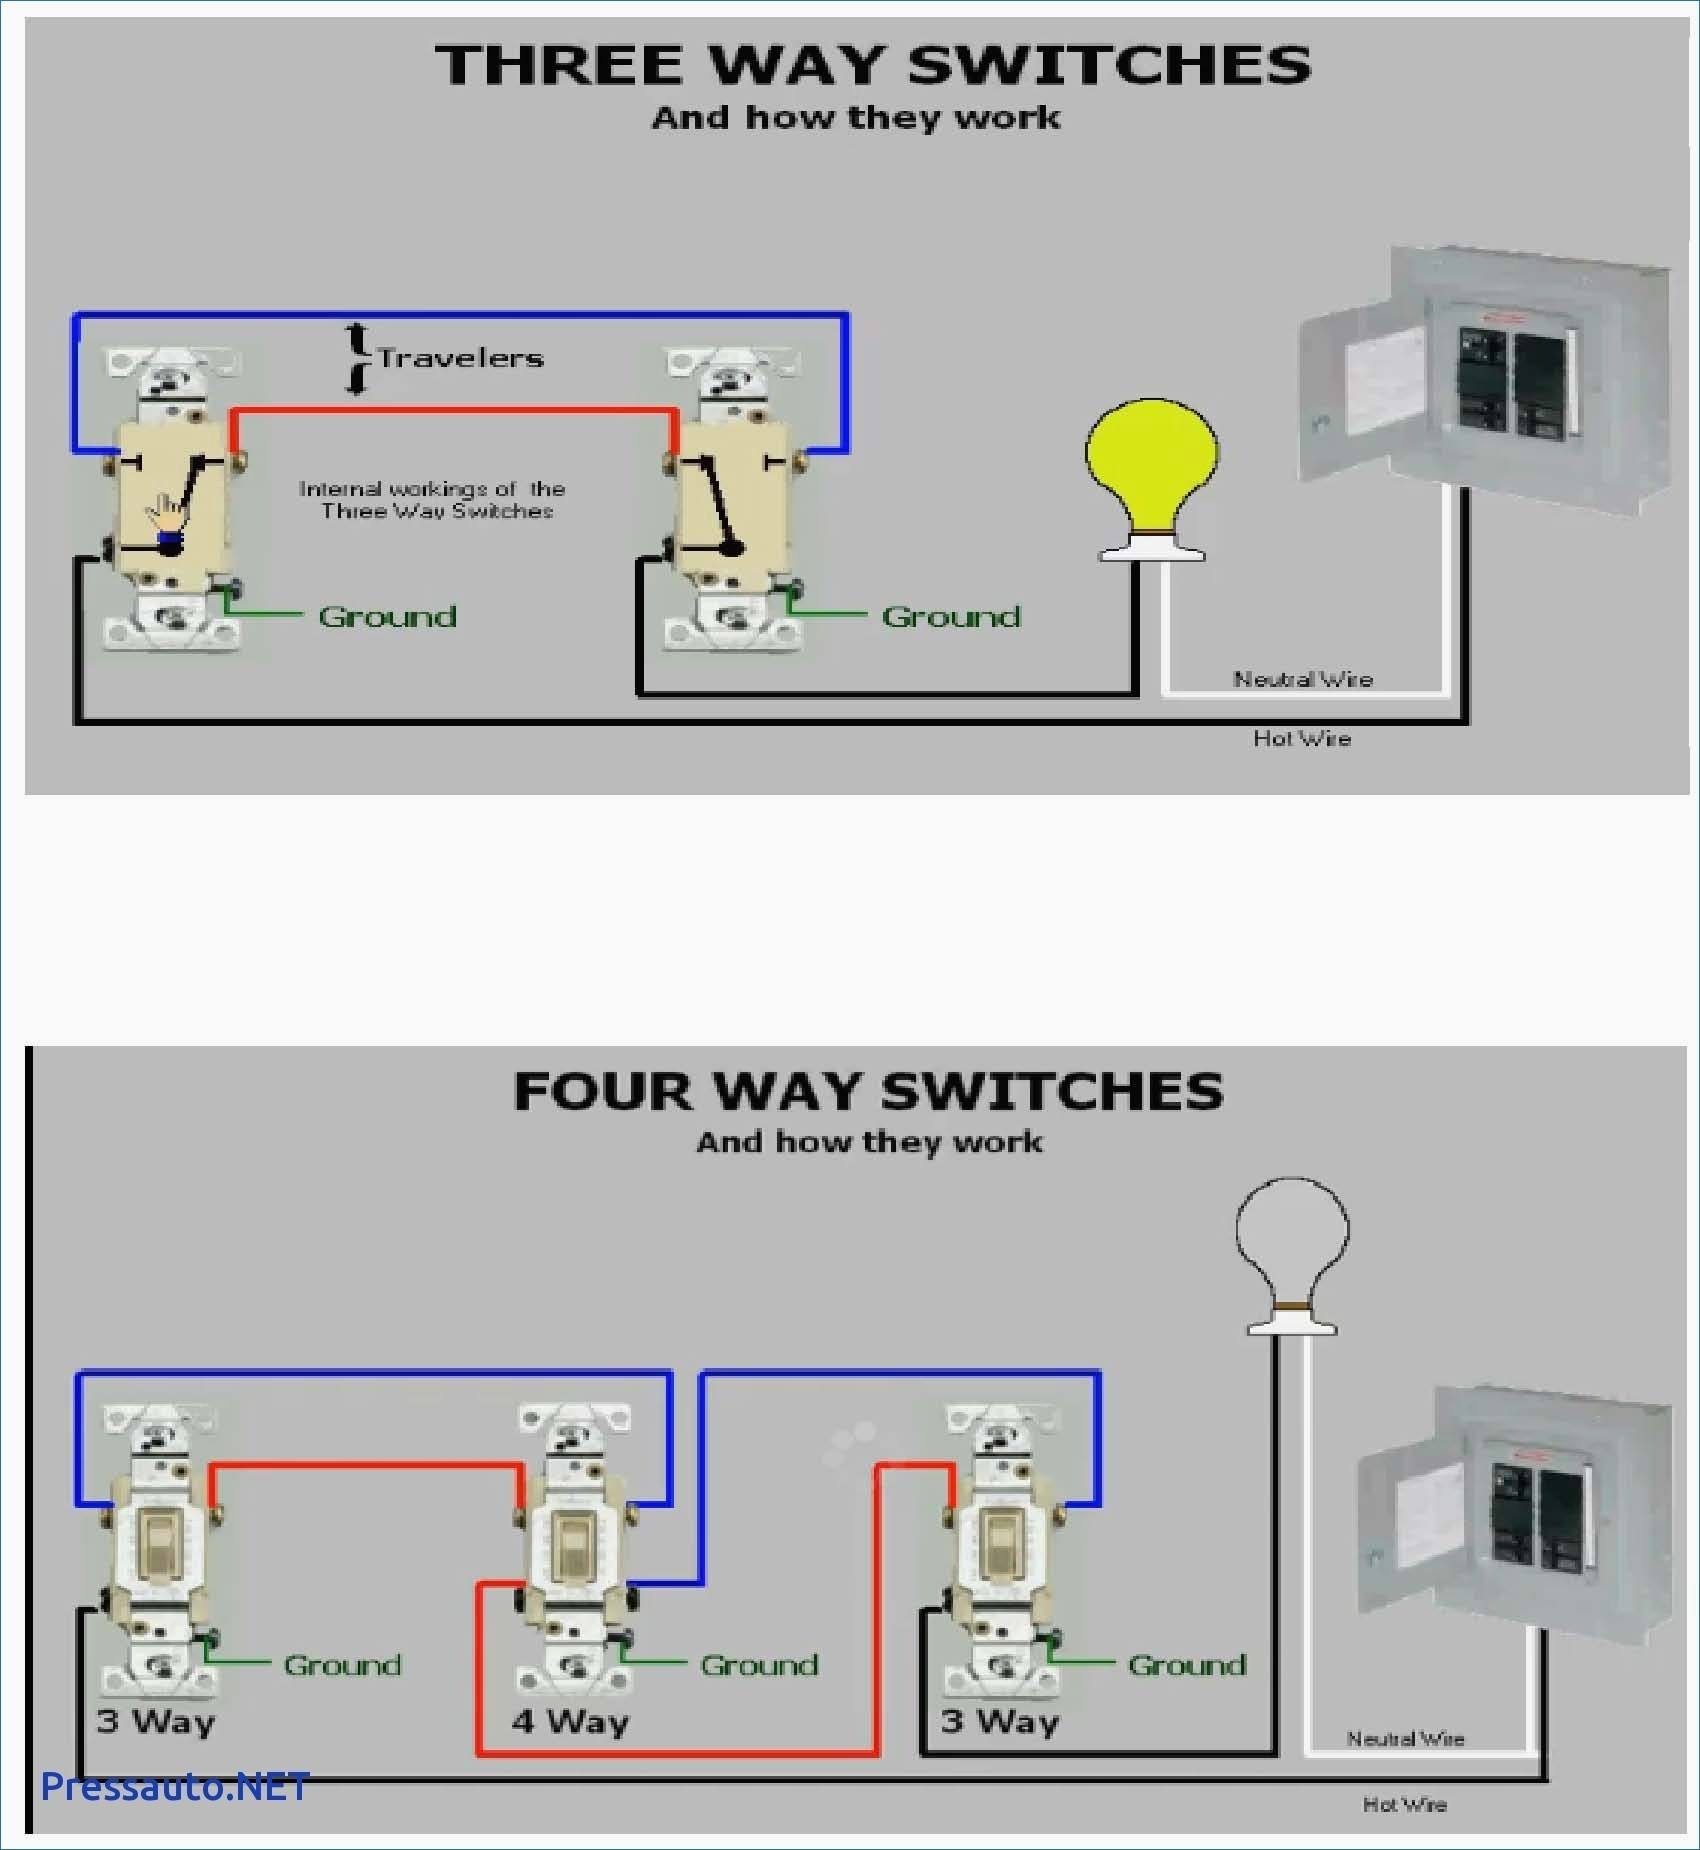
Before diving into the wiring process, it's crucial to understand what a three-way switch is and how it works. Unlike a standard single-pole switch, which controls a light from one location, a three-way switch allows you to control the same light from two different locations. This is achieved through a unique wiring configuration involving two switches and a traveler wire.
At its core, a three-way switch has three terminals: one common terminal and two traveler terminals. The common terminal is connected to the power source or the light fixture, while the traveler terminals are connected to the corresponding terminals on the second switch. This setup allows the switches to communicate with each other, enabling the light to be turned on or off from either location.
Key Components of a Three-Way Switch
- Common Terminal: The terminal that connects to the power source or the light fixture.
- Traveler Terminals: Two terminals that connect to the corresponding terminals on the second switch.
- Traveler Wires: Wires that carry the electrical signal between the two switches.
Tools and Materials Needed
To successfully wire a three-way switch, you'll need the right tools and materials. Having everything prepared beforehand will make the process smoother and more efficient.
- Screwdriver: Both flathead and Phillips for securing wires and switches.
- Wire Strippers: For removing insulation from wires.
- Voltage Tester: To ensure the power is off before starting the project.
- Needle-Nose Pliers: For bending and manipulating wires.
- Electrical Tape: For insulating wire connections.
- Three-Way Switches: Two switches are required for the setup.
- Electrical Wires: Typically 14/3 or 12/3 wires depending on the circuit's amperage.
Safety Precautions
Safety should always be your top priority when working with electrical systems. Failure to follow proper safety protocols can result in serious injury or even death. Here are some essential safety precautions to keep in mind:
- Turn Off the Power: Always turn off the power at the circuit breaker before starting any electrical work.
- Use a Voltage Tester: Double-check that the power is off by using a voltage tester on the wires.
- Wear Protective Gear: Use insulated gloves and safety goggles to protect yourself from accidental shocks.
- Work in a Well-Lit Area: Ensure your workspace is adequately lit to avoid mistakes.
Step-by-Step Wiring Guide
Now that you're familiar with the components and safety measures, let's walk through the step-by-step process of wiring a three-way switch.
Step 1: Turn Off the Power
Before you begin, locate your home's circuit breaker and turn off the power to the circuit you'll be working on. Use a voltage tester to confirm that the power is off.
Read also:Unblocked Games Retro Bowl The Ultimate Guide For Gamers
Step 2: Remove the Existing Switch
Unscrew the faceplate and carefully remove the existing switch from the wall. Take note of how the wires are connected, as this will guide your new wiring setup.
Step 3: Identify the Wires
Typically, you'll find three wires: a black (common), a red (traveler), and a white (neutral). The ground wire (green or bare copper) should also be present.
Step 4: Connect the Wires to the First Switch
Attach the black wire to the common terminal, the red and white wires to the traveler terminals, and the ground wire to the grounding screw.
Step 5: Repeat for the Second Switch
Follow the same wiring configuration for the second switch, ensuring that the traveler wires are connected to the corresponding terminals.
Step 6: Test the Setup
Once both switches are installed, restore power at the circuit breaker and test the switches to ensure they control the light as expected.
Common Mistakes to Avoid
Even experienced DIYers can make mistakes when wiring a three-way switch. Here are some common errors and how to avoid them:
- Incorrect Wire Placement: Ensure that the wires are connected to the correct terminals on each switch.
- Skipping the Voltage Test: Always test the wires to confirm the power is off before starting work.
- Poor Insulation: Use electrical tape to insulate all connections properly.
Troubleshooting Tips
If your three-way switch setup isn't working as expected, here are some troubleshooting tips:
- Double-Check Connections: Ensure all wires are securely connected to the correct terminals.
- Inspect for Loose Wires: Loose wires can cause intermittent issues with the switches.
- Consult a Professional: If you're unable to resolve the issue, consider hiring a licensed electrician.
Advanced Techniques for Wiring
For those looking to take their electrical skills to the next level, consider exploring advanced techniques such as:
- Four-Way Switches: Adding a third switch to control the same light from multiple locations.
- Smart Switch Integration: Incorporating smart switches for voice or app-based control.
Frequently Asked Questions
Here are some common questions and answers about wiring a three-way switch:
Q: Can I use a dimmer switch in a three-way setup?
A: Yes, but you'll need a three-way dimmer switch specifically designed for this purpose.
Q: What gauge wire should I use?
A: Use 14/3 wire for 15-amp circuits and 12/3 wire for 20-amp circuits.
Conclusion
Wiring a three-way switch is a valuable skill that can enhance your home's functionality and save you money on professional electrician fees. By understanding the components, following safety precautions, and adhering to a step-by-step process, you can confidently complete this project. Remember to double-check your work, troubleshoot any issues, and consult a professional if needed.
We hope this guide has provided you with the knowledge and confidence to tackle your next electrical project. If you found this article helpful, please share it with others or leave a comment below. For more tips and tutorials, explore our other articles on home improvement and electrical systems.