Transforming your outdoor space into a functional and beautiful area starts with understanding the process of laying pavers. Whether you're planning a new patio, driveway, or garden pathway, pavers offer a durable, versatile, and aesthetically pleasing solution. This guide will walk you through everything you need to know about laying pavers, from preparation to completion, ensuring your project stands the test of time while enhancing your property’s value. Proper installation is key to achieving both durability and visual appeal, making it essential to follow expert advice throughout the process.
Many homeowners and DIY enthusiasts are drawn to pavers because of their versatility and ease of maintenance. Available in various materials, colors, and shapes, pavers can complement any architectural style while providing a sturdy surface for outdoor living. However, improper installation can lead to issues such as uneven surfaces, shifting, or even structural failure. This is why understanding the proper techniques for laying pavers is crucial for achieving a professional-grade result.
In this article, we will explore the step-by-step process of laying pavers, discuss the tools and materials you’ll need, and provide tips to avoid common mistakes. We’ll also delve into the importance of proper base preparation, selecting the right type of pavers, and maintaining your newly installed surface. By the end of this guide, you’ll be equipped with the knowledge to confidently tackle your paver project or make informed decisions when hiring professionals.
Read also:Gabi Garcia A Comprehensive Guide To The Renowned Bjj Champion
- Why Choose Pavers?
- Types of Pavers
- Tools and Materials Needed
- Site Preparation: The Foundation of Success
- Base Installation: Ensuring Stability
- Laying the Pavers: Techniques and Tips
- Cutting and Fitting Pavers
- Joint Filling: The Final Touch
- Common Mistakes to Avoid
- Maintenance Tips for Longevity
Why Choose Pavers?
Pavers have become a popular choice for outdoor surfaces due to their numerous advantages. Unlike poured concrete, pavers are modular, meaning they can be easily replaced or repaired without affecting the entire surface. This flexibility is particularly beneficial in areas prone to ground movement or heavy use. Additionally, pavers come in a wide variety of materials, including concrete, brick, natural stone, and clay, offering endless design possibilities to suit any aesthetic.
Another significant advantage of pavers is their durability. When properly installed, pavers can withstand heavy loads, harsh weather conditions, and frequent foot traffic without cracking or deteriorating. They are also slip-resistant, making them a safer option for driveways, patios, and pool decks. Furthermore, pavers are environmentally friendly, as they allow water to permeate through the joints, reducing runoff and promoting groundwater recharge.
Types of Pavers
Choosing the right type of paver is essential for achieving the desired look and functionality of your outdoor space. Below are the most common types of pavers available:
- Concrete Pavers: These are cost-effective, versatile, and available in a wide range of colors and shapes. Concrete pavers are ideal for driveways, patios, and walkways.
- Brick Pavers: Known for their classic, timeless appeal, brick pavers are made from clay and offer excellent durability. They are often used for traditional or rustic designs.
- Natural Stone Pavers: These include materials like granite, limestone, and sandstone. Natural stone pavers are prized for their unique textures and colors, making them perfect for high-end projects.
- Clay Pavers: Similar to brick pavers, clay pavers are fired at high temperatures to create a hard, durable surface. They are often used in historic or colonial-style settings.
- Permeable Pavers: Designed to allow water to pass through, permeable pavers are an eco-friendly option that helps manage stormwater runoff.
Tools and Materials Needed
Before starting your paver project, it’s important to gather all the necessary tools and materials. Having the right equipment on hand will ensure a smooth and efficient installation process. Below is a list of essential items:
- Pavers: Choose the type and quantity based on your project’s size and design.
- Base Materials: Gravel and sand are typically used to create a stable foundation.
- Edging: Plastic or metal edging helps keep the pavers in place.
- Joint Sand: Used to fill the gaps between pavers for stability.
- Tools: Shovel, tamper, level, rubber mallet, string line, and a saw for cutting pavers.
Choosing Quality Materials
Investing in high-quality materials is crucial for the longevity and performance of your paver installation. For example, using compactable gravel for the base layer ensures proper drainage and stability. Similarly, selecting pavers with a high PSI (pounds per square inch) rating ensures they can withstand heavy loads without cracking.
Site Preparation: The Foundation of Success
Proper site preparation is the most critical step in laying pavers. Skipping or rushing this phase can lead to costly repairs down the line. Begin by marking the area where the pavers will be installed using stakes and string lines. Clear the site of any grass, debris, or obstructions to create a clean slate for your project.
Read also:Jelly Bean A Sweet Treat With A Rich History And Irresistible Appeal
Once the area is cleared, excavate the soil to a depth of about 7-9 inches, depending on the type of paver and the intended use of the surface. For driveways, a deeper excavation is recommended to accommodate heavier loads. After excavation, compact the soil using a plate compactor to create a solid foundation.
Base Installation: Ensuring Stability
The base layer is the backbone of your paver installation, providing stability and preventing shifting or sinking over time. Begin by spreading a 4-6 inch layer of compactable gravel evenly across the excavated area. Use a tamper to compact the gravel thoroughly, ensuring it is level and firm.
Next, add a 1-2 inch layer of coarse sand on top of the gravel. This sand layer serves as the bedding for the pavers, allowing for minor adjustments during installation. Use a screed board to level the sand, ensuring a consistent thickness across the entire area. A properly installed base is essential for preventing future issues such as uneven surfaces or water pooling.
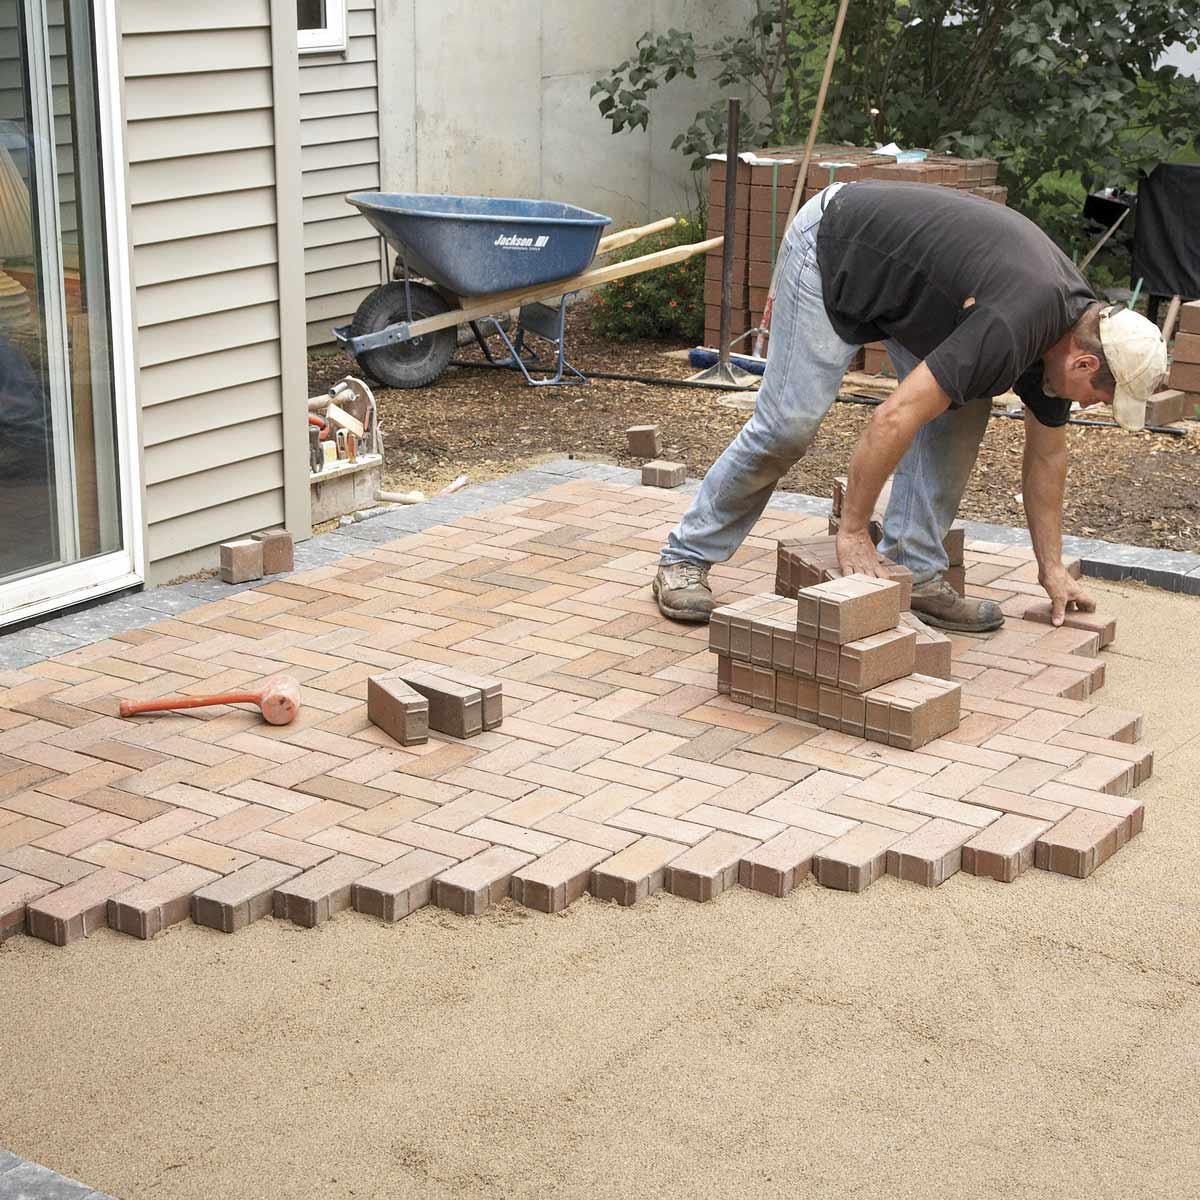
Laying the Pavers: Techniques and Tips
With the base prepared, it’s time to start laying the pavers. Begin at one corner of the project area and work your way outward, ensuring each paver fits snugly against the next. Use a rubber mallet to gently tap the pavers into place, checking their alignment with a level as you go.
To achieve a professional look, consider using a pattern such as herringbone, basket weave, or running bond. These patterns not only enhance the visual appeal but also improve the structural integrity of the surface. If your project includes curves or irregular shapes, you may need to cut some pavers to fit. Always measure carefully and use a wet saw or paver splitter for precise cuts.
Tips for a Flawless Installation
Here are some additional tips to ensure a successful paver installation:
- Install edge restraints to keep the pavers from shifting over time.
- Check the level frequently to avoid uneven surfaces.
- Work in small sections to maintain control and precision.
- Use spacers to maintain consistent gaps between pavers.
Cutting and Fitting Pavers
Cutting pavers is often necessary to accommodate edges, curves, or obstacles such as drains or posts. While this step may seem daunting, using the right tools and techniques can make the process straightforward. A wet saw is the most common tool for cutting pavers, as it provides clean, precise cuts while minimizing dust.
When cutting pavers, always measure twice and cut once to avoid wasting materials. For curved edges, consider using a paver splitter or a hammer and chisel to achieve the desired shape. After cutting, place the pavers in position and check their fit before proceeding to the next step.
Joint Filling: The Final Touch
Once all the pavers are laid, the next step is to fill the joints with sand. This process, known as joint filling, locks the pavers in place and enhances their stability. Begin by spreading fine-grained joint sand evenly over the surface, using a broom to work the sand into the gaps between the pavers.
After filling the joints, use a plate compactor to vibrate the sand into place. This step ensures the sand is packed tightly, preventing erosion and weed growth. Finally, sweep off any excess sand and inspect the surface for any areas that may need additional filling.
Common Mistakes to Avoid
Even experienced DIYers can make mistakes when laying pavers. Being aware of these common pitfalls can help you avoid costly errors and ensure a successful installation:
- Skipping Base Preparation: A poorly prepared base can lead to shifting, sinking, or cracking over time.
- Improper Compaction: Failing to compact the soil, gravel, and sand layers can result in an unstable surface.
- Ignoring Drainage: Poor drainage can cause water pooling, which may damage the pavers and base.
- Using the Wrong Tools: Cutting pavers with improper tools can lead to uneven edges and wasted materials.
Maintenance Tips for Longevity
Proper maintenance is essential for extending the lifespan of your paver installation. Regular cleaning and inspections can help prevent issues such as weed growth, sand erosion, or staining. Sweep the surface periodically to remove debris, and use a pressure washer to clean stubborn stains or dirt buildup.
Replenish the joint sand as needed to maintain stability and prevent weed growth. Applying a sealant every few years can also enhance the pavers’ appearance and protect them from stains and weathering. By following these maintenance tips, you can enjoy a beautiful and functional outdoor space for years to come.
Conclusion: Achieve Professional Results with Confidence
Laying pavers is a rewarding project that can transform your outdoor space into a functional and visually appealing area. By following the steps outlined in this guide, you can achieve professional-grade results while avoiding common pitfalls. From selecting the right materials to mastering the installation process, every detail matters when it comes to creating a durable and attractive surface.
If you’re unsure about tackling the project yourself, don’t hesitate to consult with professionals who specialize in paver installation. Their expertise can ensure your project meets the highest standards of quality and longevity. We hope this guide has provided you with the knowledge and confidence to embark on your paver project. Feel free to share your experience or ask questions in the comments below, and explore more articles on our site for additional tips and inspiration!