Understanding how to wire a 4 way switch diagram with 3 switches is essential for anyone looking to improve their home's lighting system or tackle advanced electrical projects. This guide will walk you through everything you need to know about wiring a 4 way switch setup, including detailed diagrams, step-by-step instructions, and safety tips. Whether you're a seasoned electrician or a DIY enthusiast, this article will provide you with the expertise and knowledge required to complete this task safely and effectively.
When it comes to home electrical systems, few components are as versatile and functional as the 4 way switch. This setup allows you to control a single light or group of lights from three or more locations, making it perfect for large rooms, hallways, or staircases. However, wiring a 4 way switch diagram with 3 switches can be challenging without proper guidance. This article will break down the process into manageable steps, ensuring that you can confidently tackle this project.
Before diving into the technical details, it's important to understand why a 4 way switch is different from a standard single-pole or 3 way switch. While a single-pole switch controls a light from one location and a 3 way switch allows control from two locations, a 4 way switch adds an additional point of control. This flexibility makes it a popular choice for modern homes, but it also requires a deeper understanding of electrical circuits. Let’s explore how to wire a 4 way switch diagram with 3 switches in detail.
Read also:Monalitaxo Unveiling The Rising Star In The Digital World
Table of Contents
- Introduction to 4 Way Switches
- How a 4 Way Switch Works
- Tools and Materials Needed
- Step-by-Step Wiring Guide
- Common Mistakes to Avoid
- Safety Tips for Electrical Work
- Troubleshooting Your 4 Way Switch Setup
- Diagram Explanation
- Benefits of a 4 Way Switch
- Conclusion
Introduction to 4 Way Switches
A 4 way switch is an intermediate switch used in conjunction with two 3 way switches to control a light or group of lights from three or more locations. Unlike a standard 3 way switch, which has three terminals, a 4 way switch has four terminals. These terminals allow the switch to toggle the electrical circuit between two paths, enabling additional control points.
The primary purpose of a 4 way switch is to add flexibility to your lighting system. For example, in a large living room with multiple entry points, a 4 way switch setup allows you to turn the lights on or off from any of the entrances. This is particularly useful in homes with open floor plans or multi-story layouts.
Key Features of a 4 Way Switch
- Four terminals for wiring
- Used in conjunction with two 3 way switches
- Allows control of lights from three or more locations
- Requires a specific wiring configuration
How a 4 Way Switch Works
To understand how a 4 way switch diagram with 3 switches operates, it's important to first grasp the basic principles of electrical circuits. In a standard 3 way switch setup, the circuit is completed by toggling the switches between two traveler wires. A 4 way switch adds an additional layer of complexity by introducing a second set of traveler wires.
Here’s a simplified explanation of how the circuit works:
- The power source is connected to the first 3 way switch.
- The first 3 way switch sends power through one of two traveler wires to the 4 way switch.
- The 4 way switch toggles the circuit between the two traveler wires, sending power to the second 3 way switch.
- The second 3 way switch completes the circuit, turning the light on or off.
Why Use a 4 Way Switch?
A 4 way switch is ideal for situations where you need to control a light from more than two locations. For example, in a long hallway with three entrances, a 4 way switch setup allows you to turn the lights on or off from any of the entrances. This eliminates the need to walk to a specific switch to control the lights.
Tools and Materials Needed
Before you begin wiring a 4 way switch diagram with 3 switches, it's important to gather the necessary tools and materials. Having the right equipment on hand will make the process smoother and safer.
Read also:Shubshree Sahu Mms Unveiling The Controversy And Its Impact
Tools Required
- Screwdriver
- Wire stripper
- Voltage tester
- Needle-nose pliers
- Electrical tape
- Drill (if needed for mounting switches)
Materials Required
- 4 way switch
- Two 3 way switches
- Electrical wires (14/3 or 12/3, depending on your circuit)
- Electrical box for each switch
- Wire nuts
Step-by-Step Wiring Guide
Now that you have a basic understanding of how a 4 way switch works, let's dive into the step-by-step process of wiring a 4 way switch diagram with 3 switches. Follow these instructions carefully to ensure a safe and functional setup.
Step 1: Turn Off the Power
Before starting any electrical work, turn off the power at the circuit breaker. Use a voltage tester to confirm that the power is off before proceeding.
Step 2: Install the Electrical Boxes
Mount the electrical boxes for the switches in the desired locations. Ensure that the boxes are securely attached to the wall or ceiling.
Step 3: Run the Wires
Run 14/3 or 12/3 electrical wires between the switches. Each wire contains three conductors (black, red, and white) plus a ground wire. Connect the wires to the appropriate terminals on each switch.
Step 4: Connect the First 3 Way Switch
Connect the black wire from the power source to the common terminal on the first 3 way switch. Connect the red and black traveler wires to the traveler terminals.
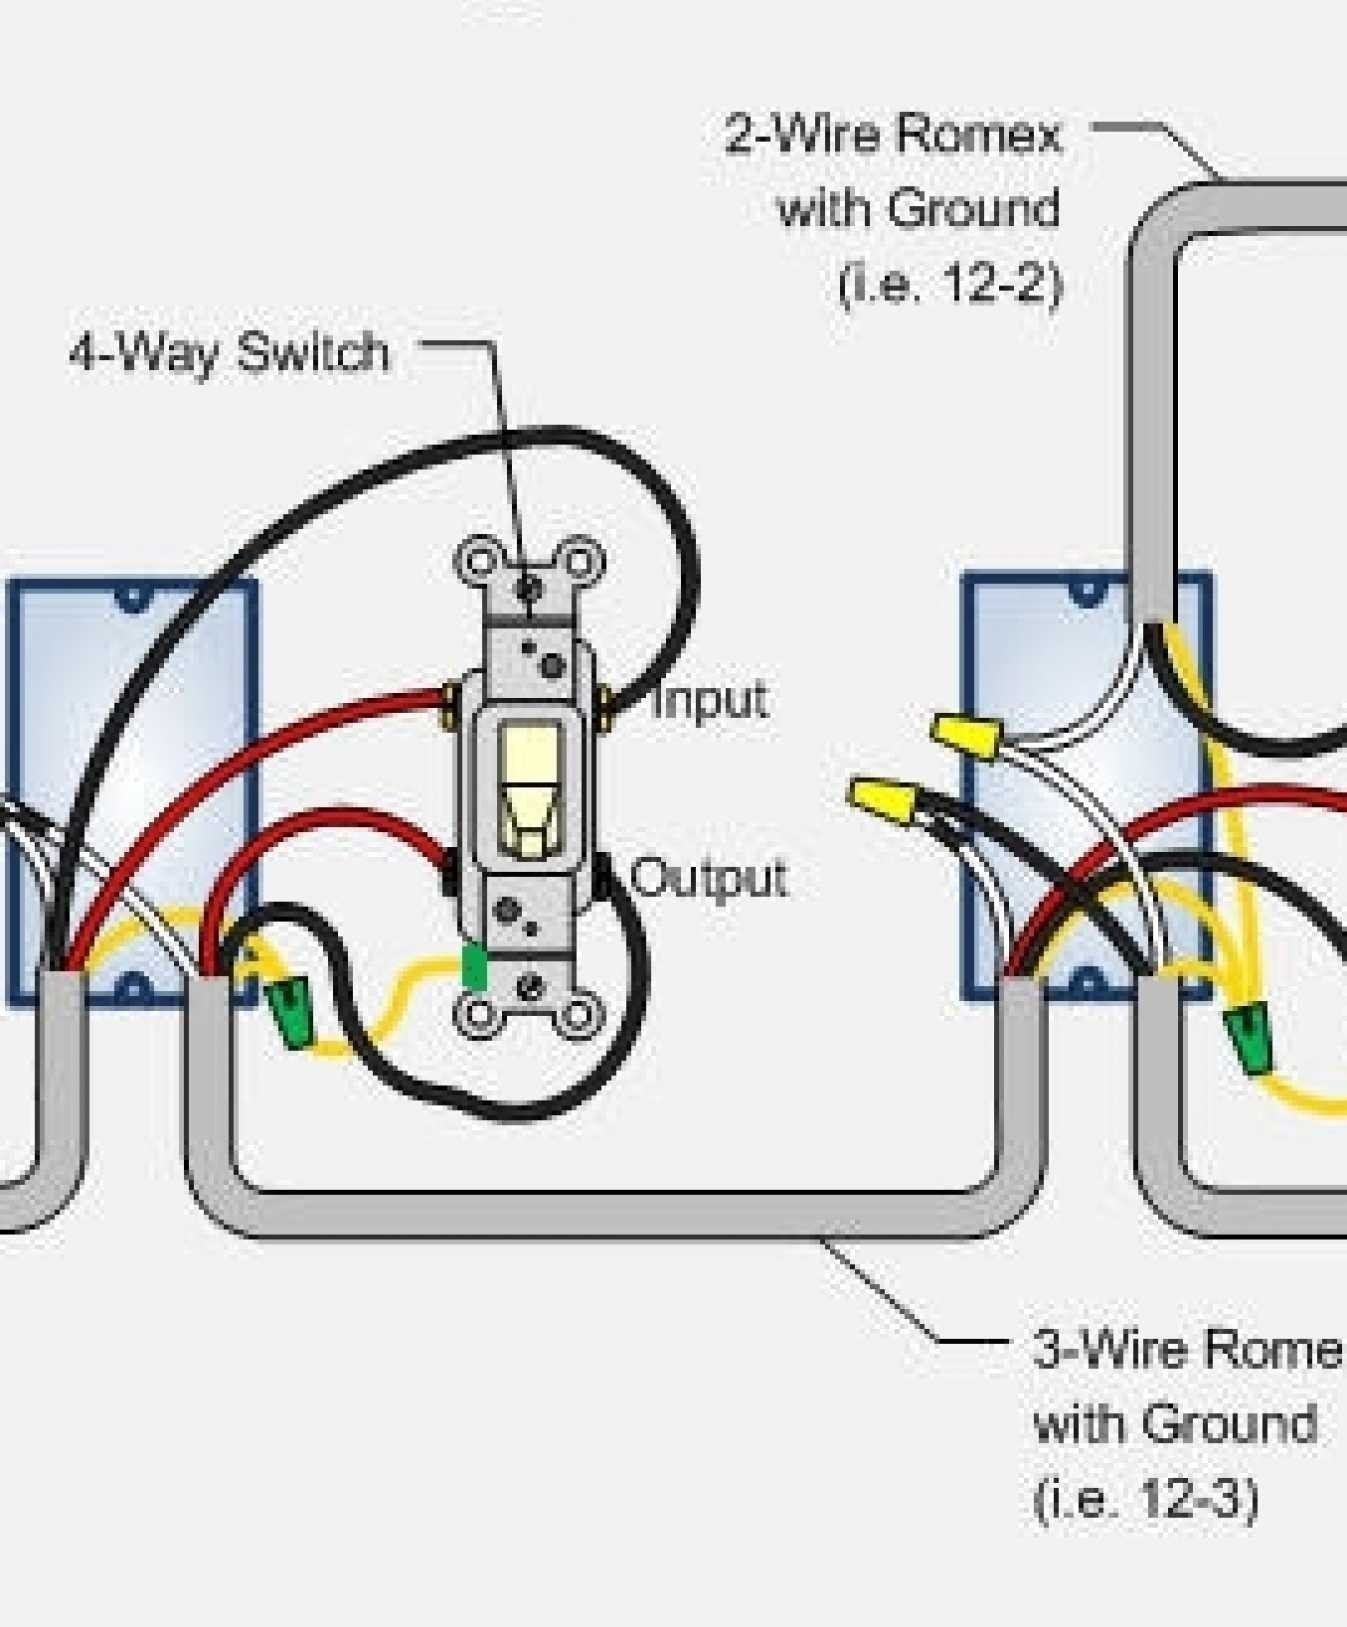
Step 5: Connect the 4 Way Switch
Connect the traveler wires from the first 3 way switch to the input terminals on the 4 way switch. Connect the traveler wires going to the second 3 way switch to the output terminals.
Step 6: Connect the Second 3 Way Switch
Connect the traveler wires from the 4 way switch to the traveler terminals on the second 3 way switch. Connect the black wire going to the light fixture to the common terminal.
Step 7: Test the Circuit
Turn the power back on and test the switches to ensure they function correctly. Each switch should be able to turn the light on or off regardless of the position of the other switches.
Common Mistakes to Avoid
When wiring a 4 way switch diagram with 3 switches, there are several common mistakes that can lead to problems. Avoid these pitfalls to ensure a successful installation.
- Forgetting to turn off the power before starting work
- Mixing up the traveler wires
- Using the wrong wire gauge
- Failing to secure the wires properly
- Not testing the circuit after installation
Safety Tips for Electrical Work
Electrical work can be dangerous if not done properly. Follow these safety tips to protect yourself and ensure a safe installation.
- Always turn off the power at the circuit breaker before starting work.
- Use a voltage tester to confirm that the power is off.
- Wear protective gear, such as gloves and safety glasses.
- Follow local building codes and regulations.
- If you're unsure about any step, consult a professional electrician.
Troubleshooting Your 4 Way Switch Setup
If your 4 way switch setup isn't working as expected, there are several potential issues to investigate. Here are some common troubleshooting steps:
- Check the wiring connections to ensure they are secure.
- Verify that the traveler wires are connected to the correct terminals.
- Test the switches individually to identify any faulty components.
- Inspect the circuit breaker to ensure it hasn't tripped.
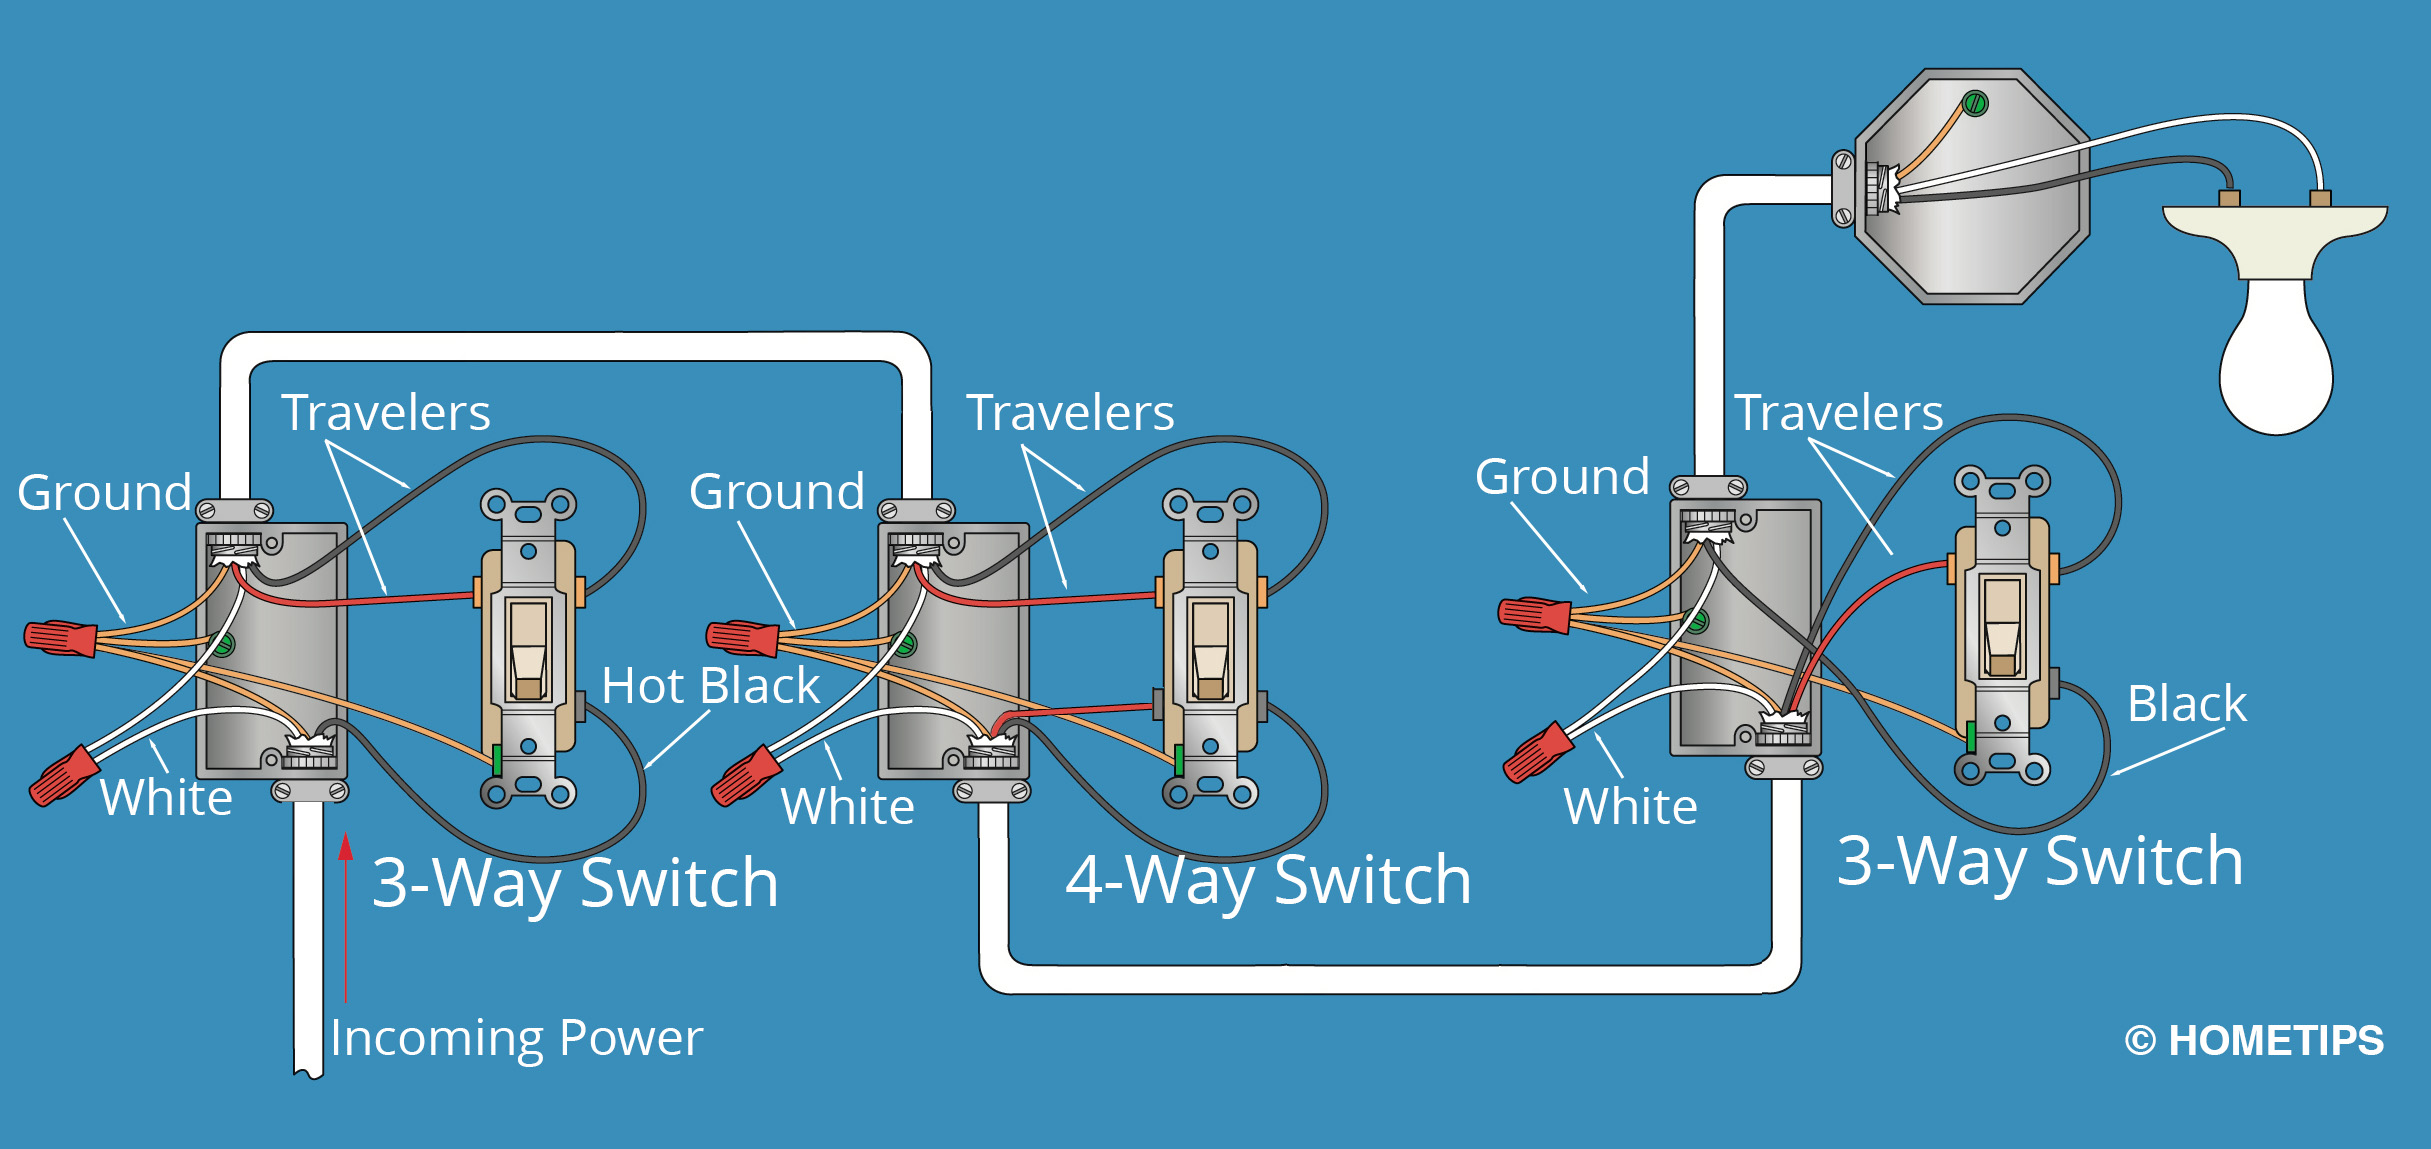
Diagram Explanation
A visual representation of a 4 way switch diagram with 3 switches can be incredibly helpful for understanding the wiring process. Below is a description of the key components in the diagram:
- The power source is connected to the first 3 way switch.
- Traveler wires connect the first 3 way switch to the 4 way switch.
- Additional traveler wires connect the 4 way switch to the second 3 way switch.
- The second 3 way switch is connected to the light fixture.
Benefits of a 4 Way Switch
Installing a 4 way switch offers several advantages for homeowners and electricians alike. Here are some of the key benefits:
- Increased convenience by allowing control from multiple locations
- Improved functionality for large rooms or hallways
- Enhanced safety by reducing the need to walk to a specific switch
- Customizable lighting options for modern homes
Conclusion
Wiring a 4 way switch diagram with 3 switches may seem daunting at first, but with the right guidance, it's a manageable project for anyone with basic electrical knowledge. By following the steps outlined in this guide, you can create a functional and safe lighting system that meets your needs.
Remember to prioritize safety, double-check your wiring, and consult a professional if you encounter any challenges. Whether you're upgrading your home's lighting or tackling a DIY project, a 4 way switch setup is a valuable addition to your electrical system. Share your experience in the comments below or explore more articles on our site for additional tips and tutorials!